- Log in to Google Analytics 4 (GA4): Open your GA4 account.
- Navigate to Events: Go to Reports → Events to find the element_visible event, or any custom event you set up.
- Review the Data: You should be able to see how often the element became visible and any additional data you tracked (such as the element’s text or the page URL).
By following these steps, you’ll be able to track when specific elements on your page become visible to users, providing valuable insights into user engagement.
Method 4: Using GA4 Enhanced Measurement (Simple Forms)
This method is ideal for basic forms where a submission leads to a page view or simple interaction.
Step 1: Enable Enhanced Measurement
Go to GA4 → Admin → Data Streams, select your stream, click the settings icon, and make sure “Form Interactions” is enabled. This allows GA4 to automatically track basic form activity.
Step 2: Check the Automatically Collected Events
GA4 typically captures form_submit and form_start events for standard forms. Review your event list to confirm these are being tracked.
Step 3: Create a Custom Event (If Needed)
If the built-in events aren’t precise enough, create your own custom event in Admin → Events.
For example, set up an event like contact_form_submission that fires when:
- An event = page_view
- And the page_location contains your thank-you page URL or slug
This ensures only genuine form submissions are recorded.
Why Track Form Submissions?
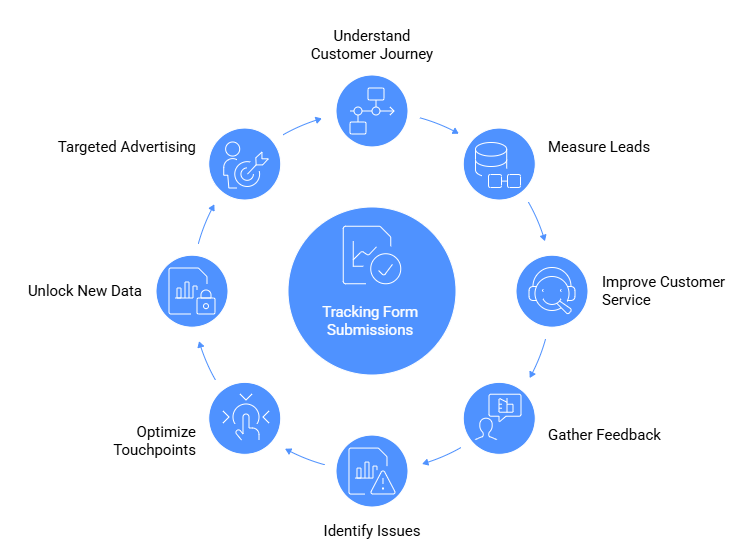
Tracking form submissions on a website is important for a variety of reasons, especially for businesses looking to improve their online presence and customer interactions. Here’s why tracking forms can be so helpful:
- Understanding the Customer Journey: By tracking how users fill out forms, businesses can see where customers are coming from and what actions lead them to make a purchase. This gives businesses a clearer picture of which marketing efforts, ads, or website features are driving potential customers.
Important Read: Customer Journey Analytics: All You Need To Know
- Measuring Leads: Tracking form submissions lets businesses keep an eye on how many leads they are generating. Whether it’s a contact form or a sign-up form, knowing how many people are reaching out or showing interest is important for assessing how well a website is performing.
- Improving Customer Service: Forms often act as a bridge between the business and the customer. They make it easy for users to get in touch, ask questions, or share feedback. By tracking these submissions, businesses can respond more quickly, improving overall customer service.
- Gathering Valuable Feedback: Forms are a great way to collect feedback from users, whether it’s about a product, service, or the website itself. Tracking these responses can provide insights into what customers like, what could be improved, and what might be missing.
- Identifying Issues: If the number of form submissions is lower than expected, it might signal a problem. This could point to issues like confusing form design, a slow website, or something in the user experience that’s making it harder for people to complete the form.
- Optimizing Touchpoints: Every form submission is a potential touchpoint with a customer. By tracking these moments, businesses can figure out where improvements are needed to make the process smoother and more engaging, helping to turn visitors into loyal customers.
- Unlocking New Data: Tracking form submissions can give businesses access to new types of data. For example, tracking form submissions as a specific event can help generate new metrics in tools like Google Analytics, providing deeper insights into customer behavior.
- Targeted Advertising: If a user fills out a form, businesses can retarget them with specific ads based on their interest. Conversely, they can also advertise to people who didn’t fill out the form, offering another chance to engage with them and bring them back.
Tracking form submissions in Google Analytics 4 may seem technical, but it’s worth the effort for the insights it provides. By understanding user interactions, you can refine your forms, enhance the user experience, and make decisions backed by data. Start implementing it today and see how it helps you grow your business.
Summary for the Blog
- Tracking form submissions is crucial for understanding the customer journey, measuring leads, and optimizing a website.
- The blog outlines three methods to track form submissions using Google Analytics 4 (GA4): Google Tag Manager (GTM), Thank-You Page Tracking, and Element Visibility Trigger.
- Each method is described with step-by-step instructions from initial setup in GTM to viewing the data in GA4.
- The article emphasizes that tracking forms is a valuable effort for gaining insights and making data-backed decisions.
Tracking form submissions in Google Analytics 4 (GA4) is a smart way to keep an eye on how your website is performing and how users are interacting with your forms. Whether you’re tracking contact forms, sign-ups, or lead generation forms, knowing how well these forms are converting can help you make better decisions for your site.
GA4 offers a flexible way to measure form submissions, giving you valuable insights into user behavior. With the right setup, you can easily see how many people are filling out your forms, which ones are most popular, and where users might be dropping off. This data can help you improve the user experience, make your forms more engaging, and ultimately boost conversions. Before delving into this, learn how to set up Google Analytics to track your form submissions accurately.
Now, let’s explore the steps to track form submissions in Google Analytics 4!
4 Ways to Track Your Form Submission in Google Analytics 4
Tracking form submissions on your website might seem tricky at first, but once you break it down, it’s a simple process. Here’s a step-by-step guide to help you track when someone submits a form on your site.
Method 1: Using Google Tag Manager (GTM) to Track Form Submissions
Step 1: Set Up Google Tag Manager
First, you’ll need to set up Google Tag Manager (GTM) on your website. If you haven’t done this yet, follow these steps:
- Create a GTM Account: Go to the GTM website and sign up for an account if you don’t already have one.
- Install GTM on Your Website: After creating an account, GTM will give you a container code. You need to place this code in the <head> and <body> sections of your website’s HTML. You’ll find these instructions in your GTM dashboard.
Related Read – How to Install Tag Manager on BigCommerce?
Step 2: Create a Trigger for Form Submissions
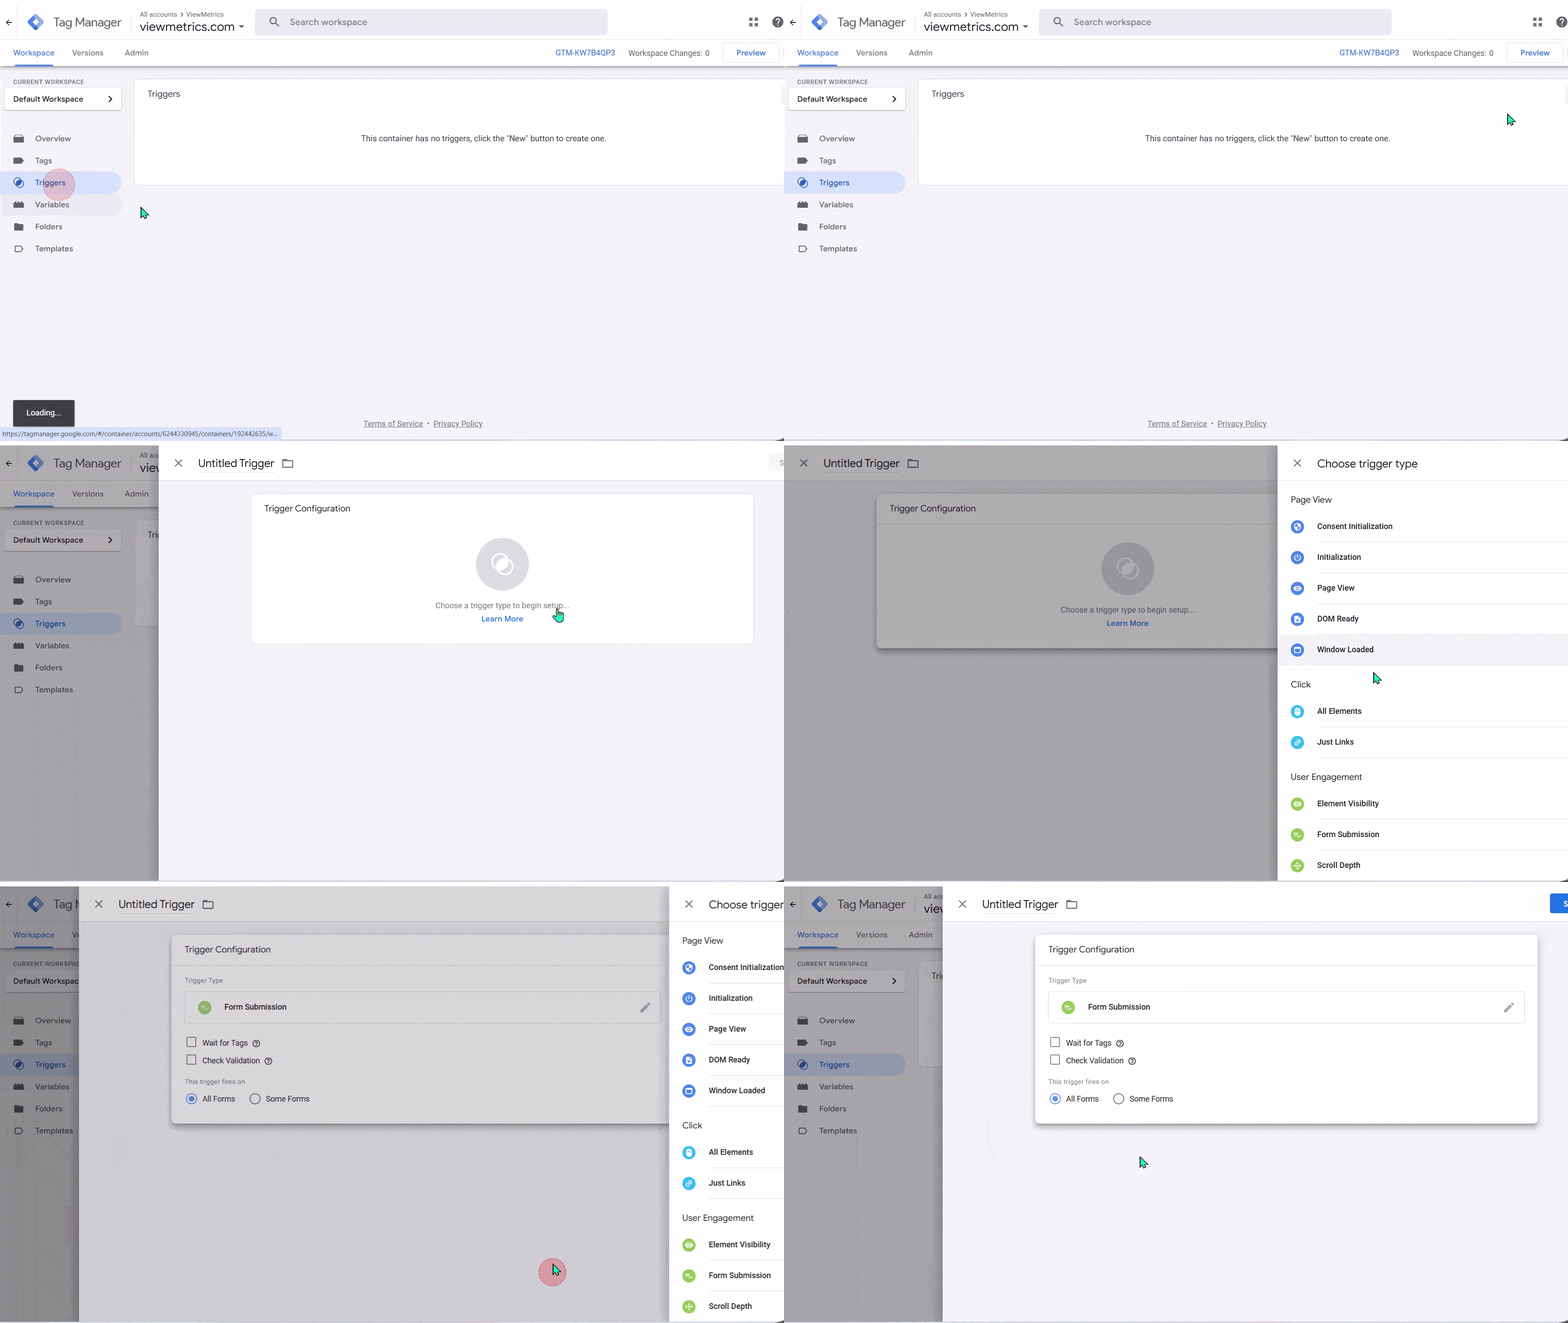
In GTM, “Triggers” are used to detect specific actions on your website, such as a form submission. Here’s how to create a trigger to track form submissions:
- Open GTM and Navigate to Triggers: From the left menu in GTM, click on “Triggers.”
- Create a New Trigger: Click “New” to start setting up your trigger.
- Select Form Submission: From the trigger options, choose “Form Submission.”
- Configure the Trigger Settings:
-
- Check the option that says Wait for Tags and set a timeout (for example, 2000 milliseconds).
-
- Enable Check Validation to ensure that only valid forms are tracked.
-
- Under the This trigger fires on section, choose Some Forms to limit the tracking to specific forms.
-
- Define the rules based on your form’s details. For example, you can filter by Form ID, Form Classes, or Page URL.
To find your form’s details:
- Open the form on your website.
- Right-click and select Inspect to open the developer tools.
- Look for the form’s ID or Class name, which you can use to set conditions in the trigger.
-
Once you’ve set this up, name your trigger something like Form Submission Trigger and click Save.
Step 3: Create a Tag for Tracking the Form Submission
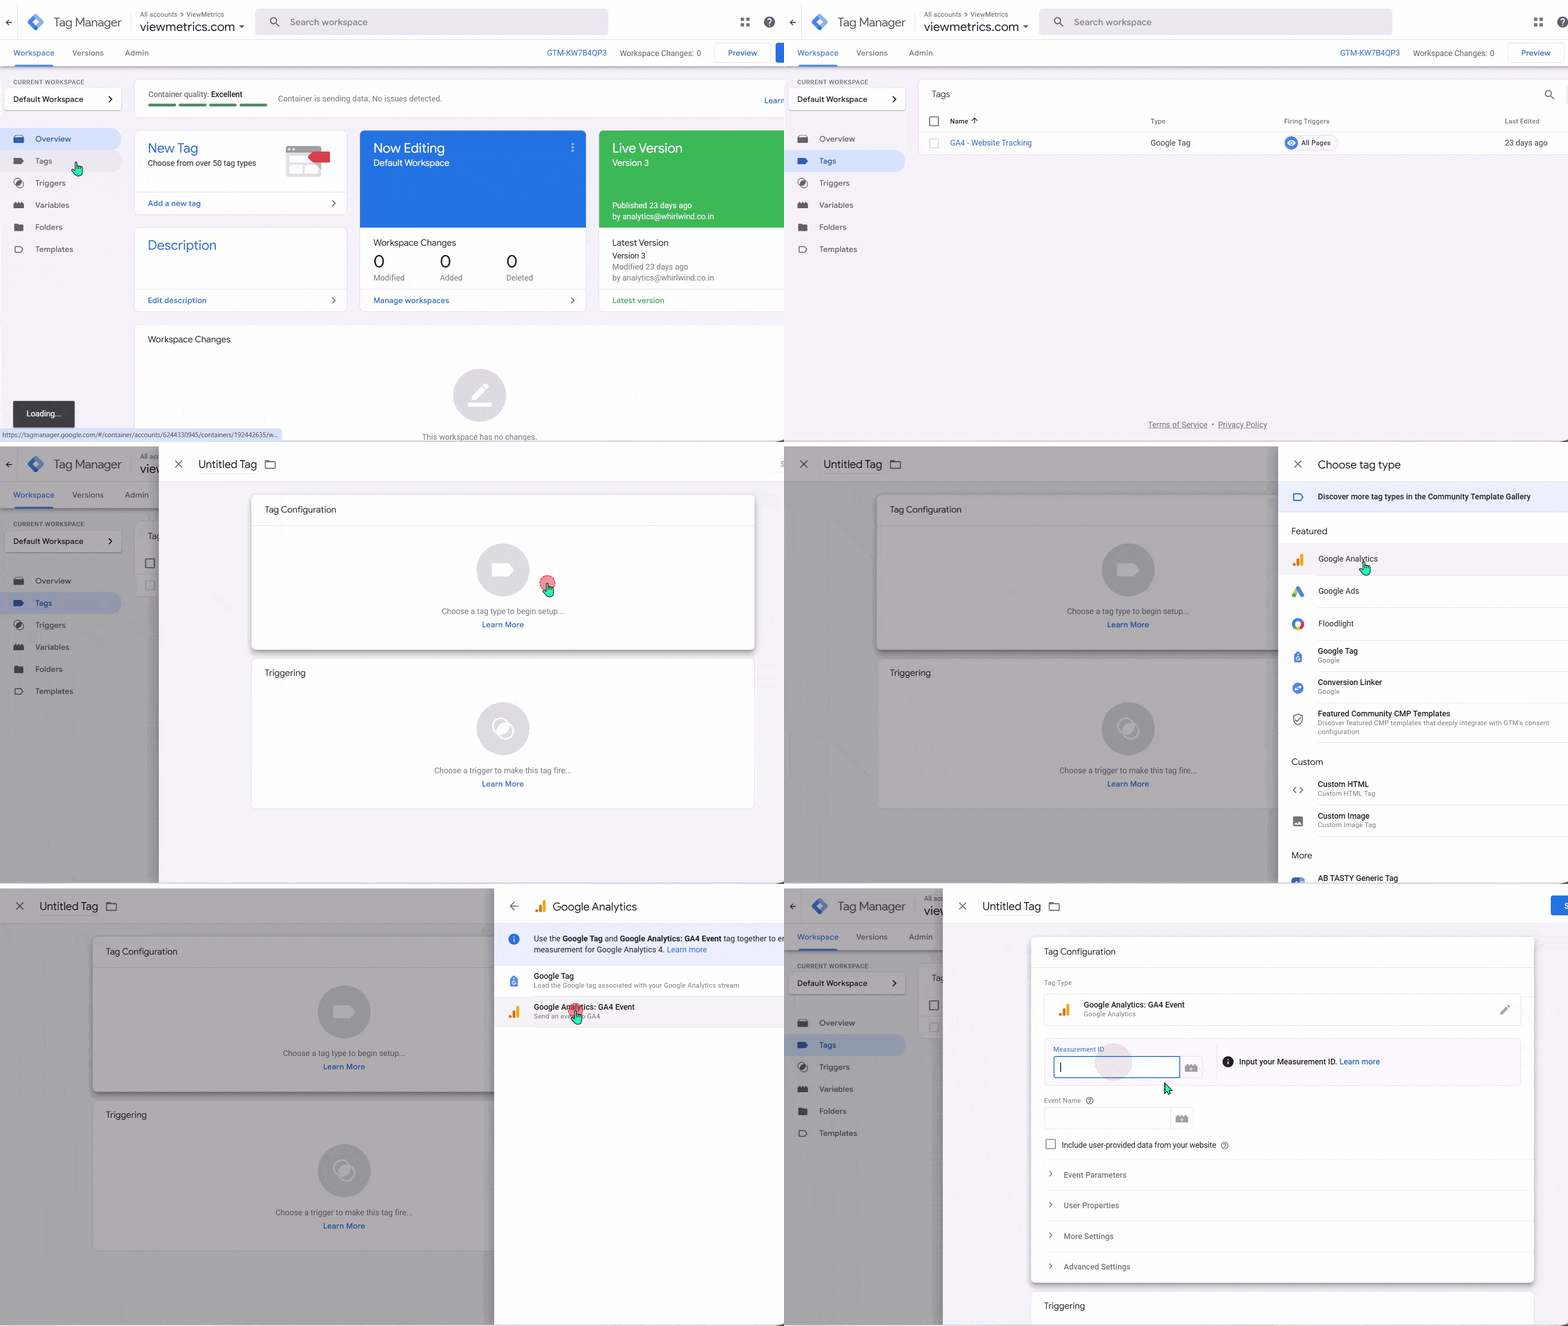
Now that you’ve created a trigger, you need to set up a tag to actually send the data to a platform like Google Analytics.
- Go to Tags: In GTM, click on “Tags” in the left-hand menu.
- Create a New Tag: Click New to create your tag.
- Set Up the Tag:
- Give your tag a name, such as “Form Submission Tag.”
- Under Tag Configuration, select the type of tracking you want to use. For Google Analytics, you’ll choose something like Google Analytics 4 Event.
- Choose the Track Type as “Event” and fill in the necessary details like the Measurement ID and event name.
- Link the Trigger: Under the Triggering section, select the Form Submission Trigger that you created earlier.
- Save: Click Save once you’ve set up the tag.
Step 4: Test the Tag
Before you make the tag live, you should test it to make sure it’s working properly.
- Enable Preview Mode: In GTM, click on the Preview button at the top right of the dashboard.
- Submit the Form on Your Website: Go to your website and fill out the form. When you submit it, GTM’s debug mode will open at the bottom of the page.
- Check for the Tag: The debug mode will show you whether or not the tag fires when the form is submitted. If everything looks good, you’re ready to move on. You can also use the Google Tag Assistant Chrome extension to verify the tag’s performance.
Step 5: Publish Your Changes
Once you’ve confirmed that the tag is working correctly, you can publish it.
- Go to Your GTM Dashboard: In GTM, click on Submit in the top right corner.
- Add a Version Name and Description: Give your version a name (e.g., “Form Submission Tracking”) and add a description of what you’ve done.
- Click Publish: This will make the tag live on your website.
Step 6: View Form Submission Data in Google Analytics 4
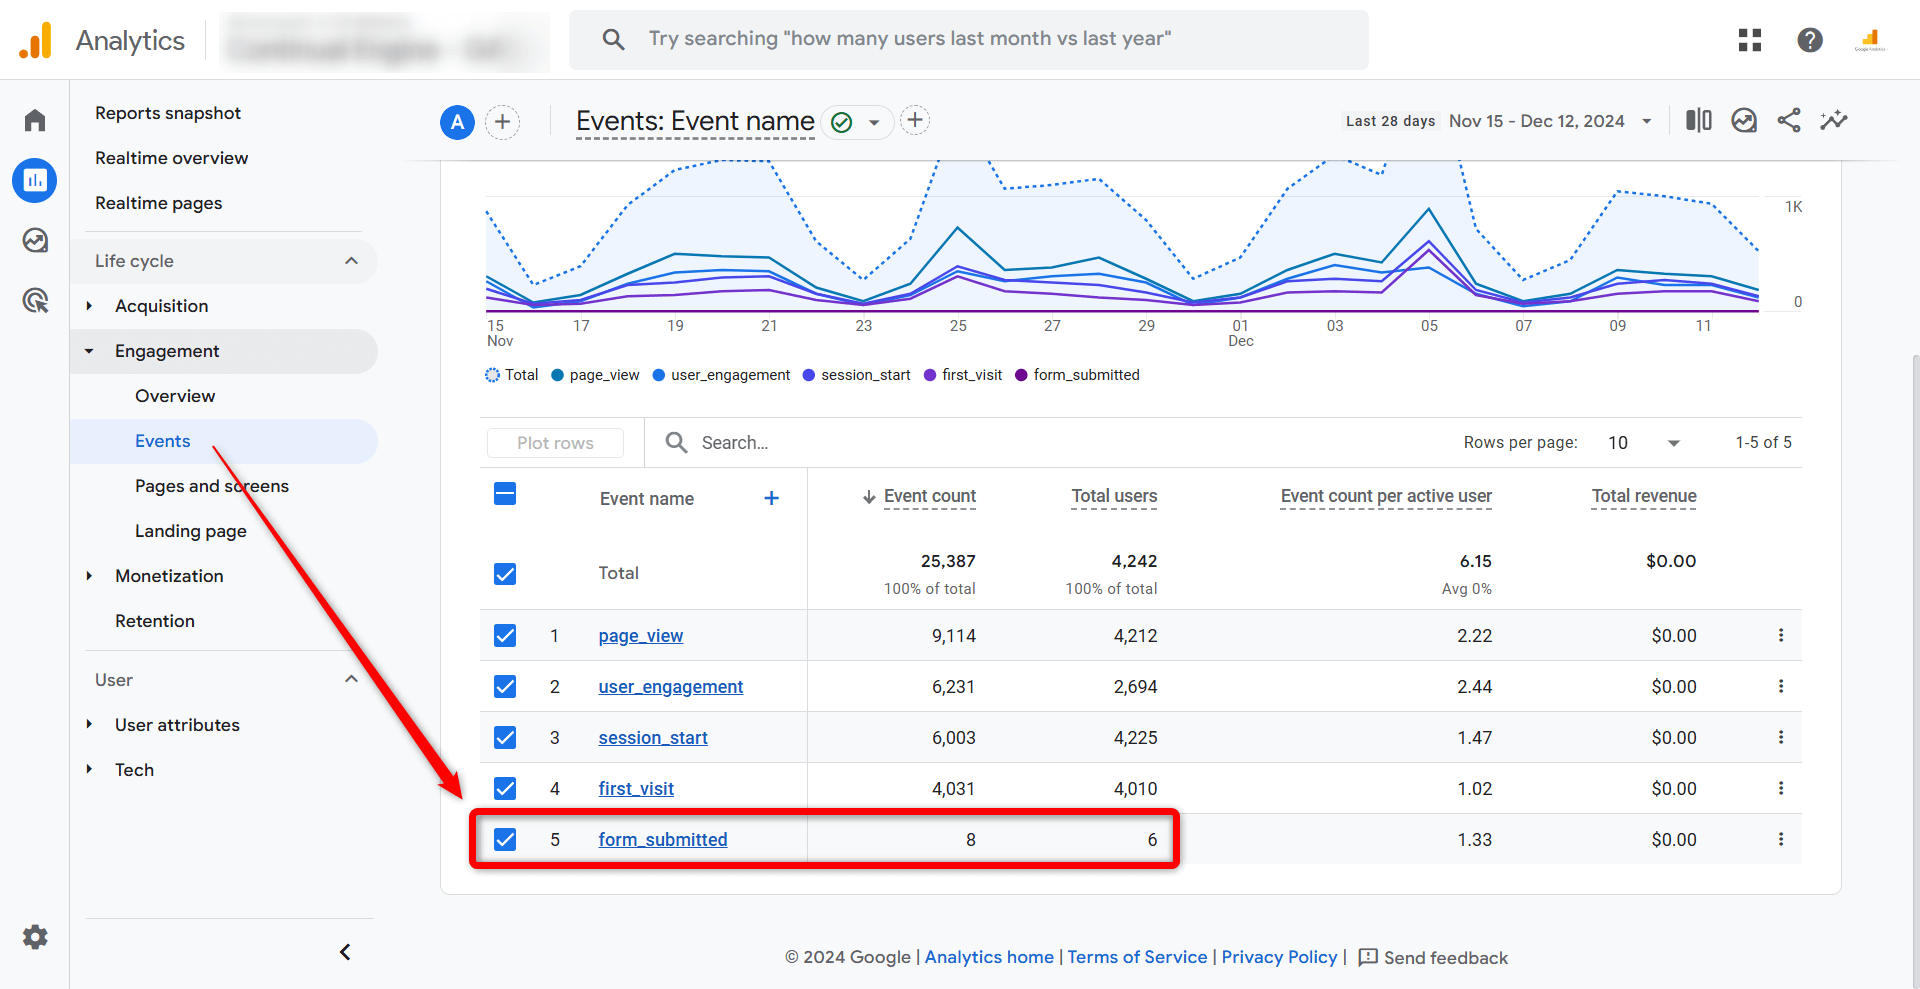
Now that your form submissions are being tracked, you can view the data in your analytics platform, like Google Analytics.
- Open Google Analytics: Log in to your Google Analytics account.
- Navigate to Events: Go to Reports → Life Cycle → Engagement → Events to see the form submission data.
- Check the Event: Look for the event you set up in GTM. It should appear here, showing you how many times the form has been submitted.
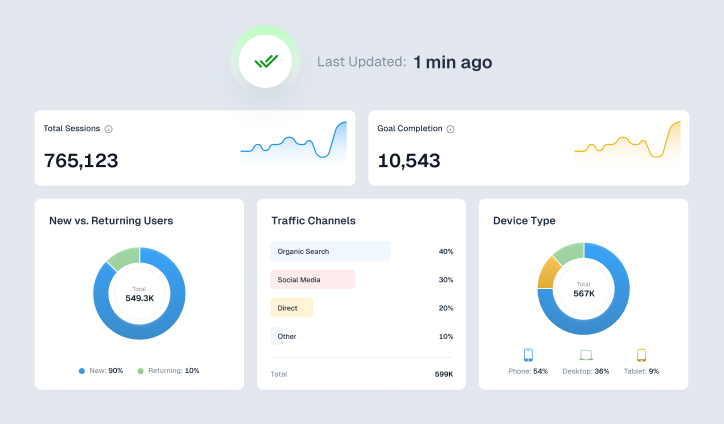
Track your form submissions effortlessly with ViewMetrics’ Website Analytics Dashboard!
View All Your Marketing and Website Data - Instantly
Connect Instagram, Mailchimp, Google Analytics & more
Pre-built dashboards, no setup needed
Save hours on reporting every week

Method 2: Thank-You Page Tracking
Here’s how you can track form submissions using the “Thank-You” page method:
Step 1: Set Up a Trigger for the Thank-You Page
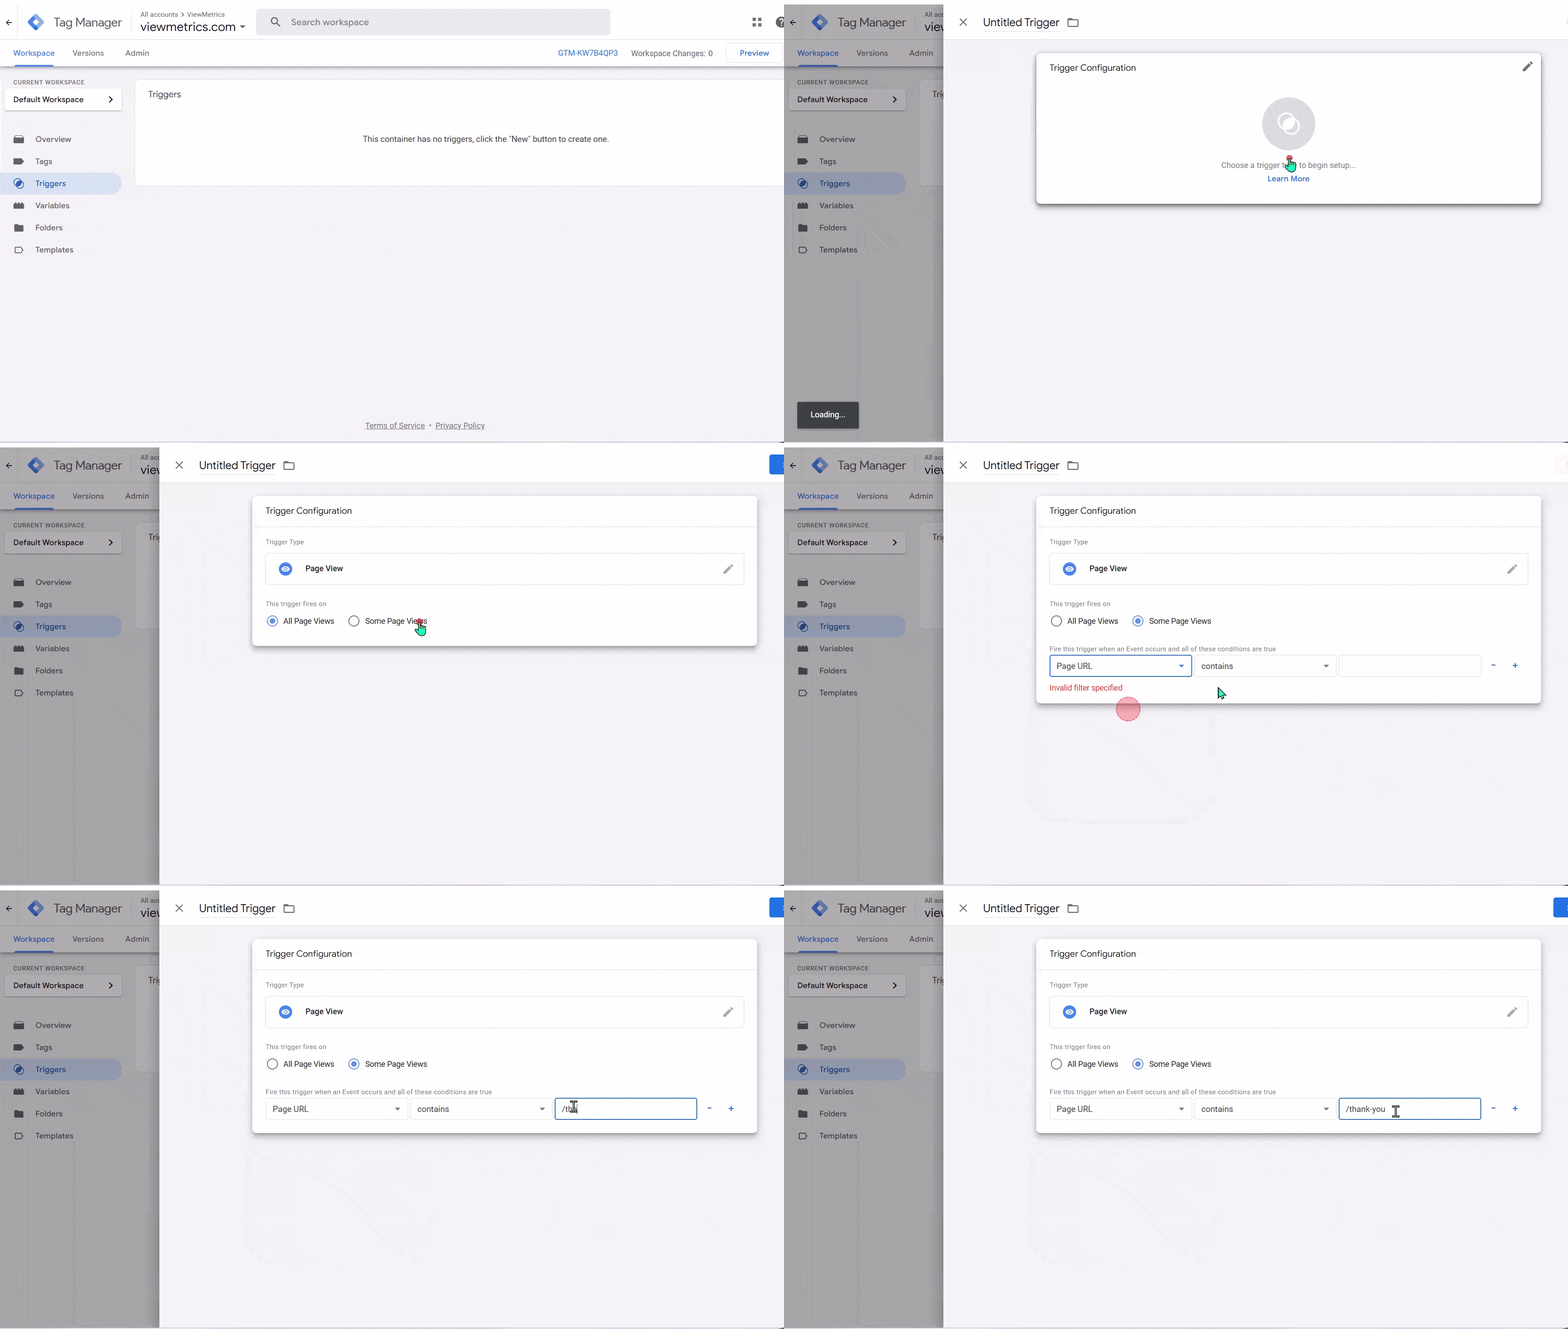
The first step is to create a trigger in GTM that will fire when someone visits the Thank-You page on your website.
- Open GTM and Go to Triggers: In your GTM dashboard, click on Triggers in the left menu.
- Create a New Trigger: Click on New to create a new trigger.
- Choose Trigger Type: Select Page View as the trigger type. This means the trigger will activate when a specific page is viewed.
- Set Conditions: Under This trigger fires on, choose Some Page Views. This ensures that the trigger only activates on specific pages.
- Define the Page URL: Set the condition to match the URL of your Thank-You page. You can either use:
- Page URL contains or
- Page URL equals
- For example, if your Thank-You page has the URL “/thank-you,” your condition would be: Page URL contains /thank-you.
- Name and Save the Trigger: Name the trigger something like “Thank-You Page Trigger” and click Save.
Step 2: Create a GA4 Event Tag
Next, you need to create a tag that sends data to Google Analytics whenever the Thank-You page is visited.
- Go to Tags: In GTM, click on Tags in the left menu.
- Create a New Tag: Click New to create a new tag.
- Select Tag Type: Choose Google Analytics: GA4 Event as the tag type.
- Link to Your GA4 Configuration Tag: In the Configuration Tag section, select the GA4 configuration tag you’ve already set up for your site.
- Add Measurement ID: Ensure the correct Measurement ID for your GA4 property is added.
- Set the Event Name: In the Event Name field, enter a custom name like thank_you_page_view. This is the event that will be sent to GA4 when the Thank-You page is viewed.
- Set the Trigger: Under the Triggering section, select the Thank-You Page Trigger you created earlier.
- Name and Save the Tag: Name the tag something like “GA4 Thank-You Page Event Tag” and click Save.
Step 3: Test the Tag
Before you publish the tag, it’s important to test it to ensure it’s working properly.
- Enable Preview Mode in GTM: In GTM, click on Preview at the top right of the dashboard to enable preview mode.
- Visit the Thank-You Page: Go to your website and visit the Thank-You page.
- Check the Debug Mode: The GTM debug mode should appear at the bottom of the page. This will show whether the tag fires correctly when the Thank-You page loads. You should see your thank_you_page_view event listed.
Step 4: Publish the Tag
Once you’ve confirmed that the tag is working as expected, you can publish it to make it live.
- Go Back to GTM: In your GTM dashboard, click on Submit in the top right corner.
- Add a Version Name and Description: Provide a name and description for the version, such as “Thank-You Page Event Tracking.”
- Publish the Tag: Click Publish to make your changes live on your website.
Step 5: View Data in GA4
Now that you’ve set up tracking for the Thank-You page, you can check the data in Google Analytics 4.
- Log Into GA4: Open your Google Analytics 4 account.
- Navigate to Events: Go to Reports → Events to see the data for your Thank-You page visits.
- Check for the Event: Look for the thank_you_page_view event in the list of events. You should see the number of times the Thank-You page has been viewed.
Method 3: Using the Element Visibility Trigger in Google Tag Manager
Google Tag Manager (GTM) provides a way to set up an Element Visibility Trigger, which fires when certain elements on a page appear within the user’s view. Here’s a step-by-step guide on how to set this up:
Step 1: Create the Element Visibility Trigger
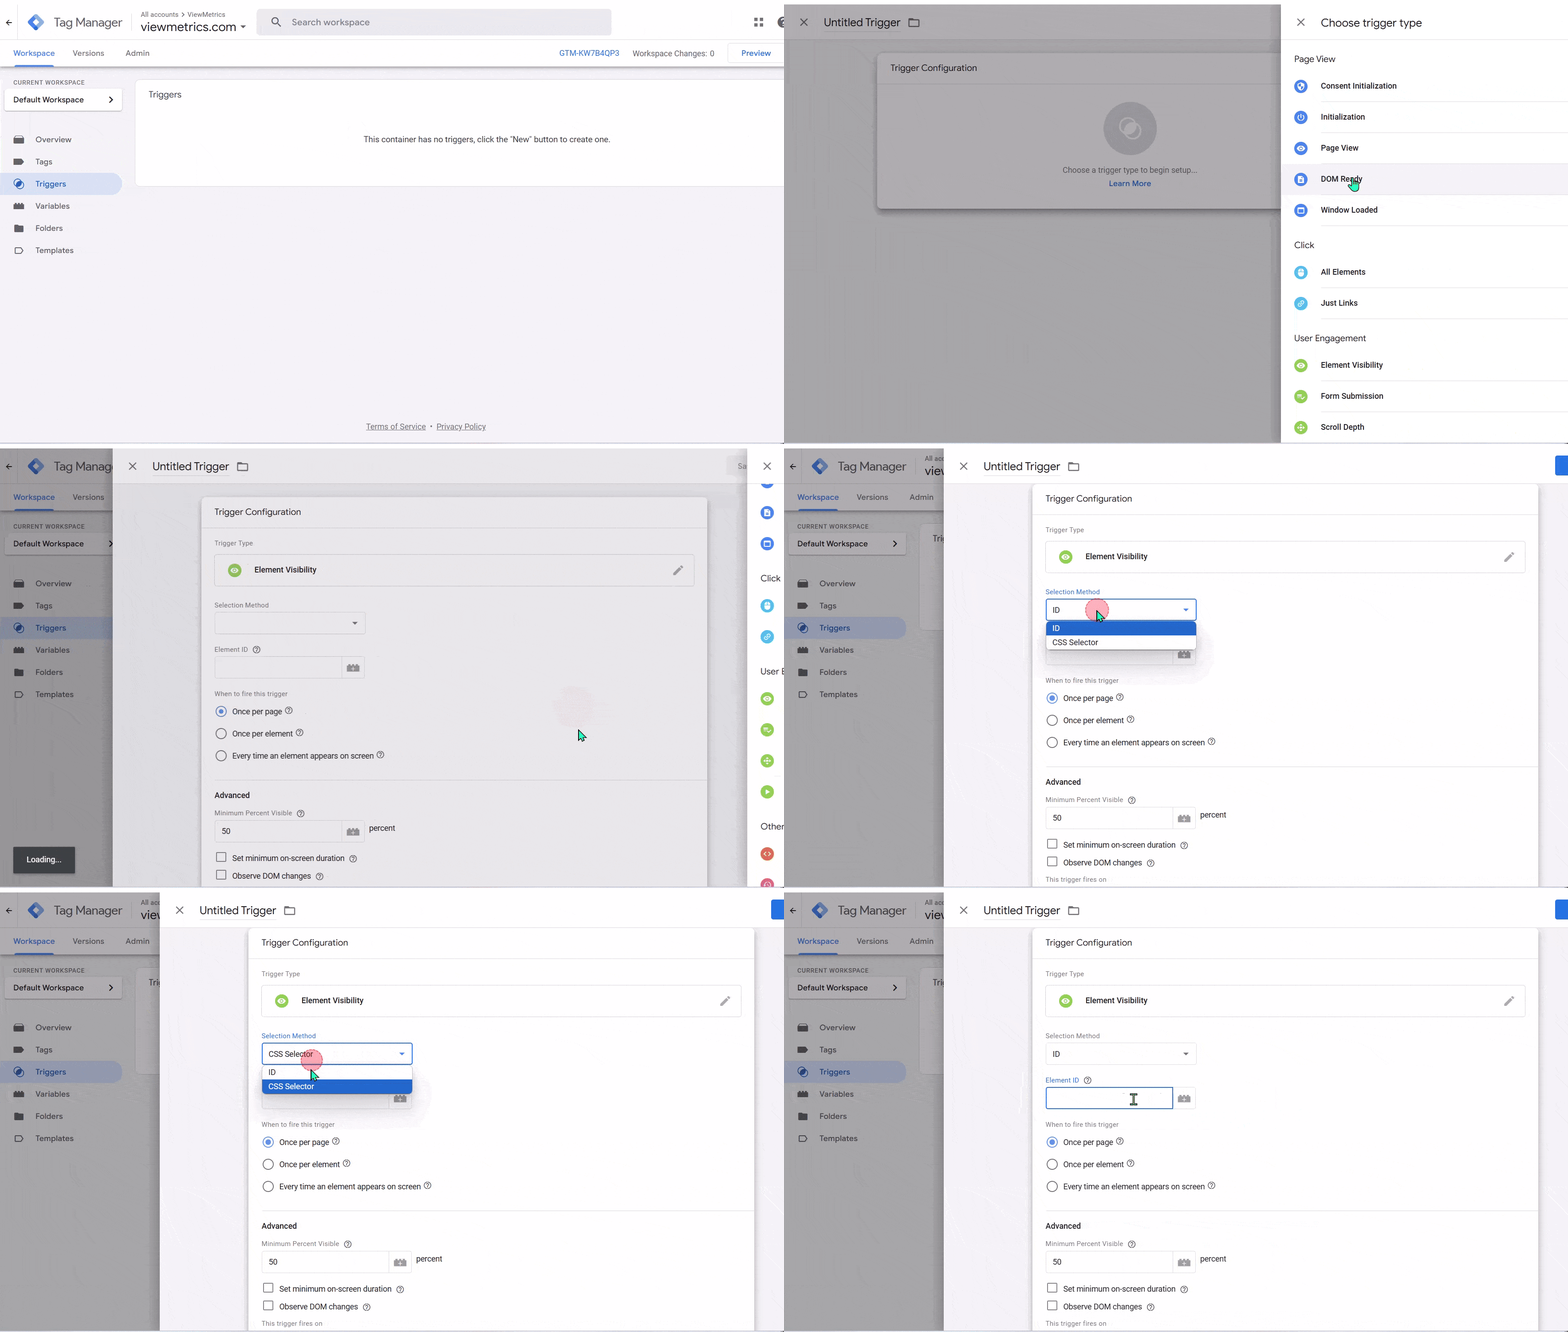
- Log in to Google Tag Manager: Start by logging into your GTM account and open your workspace.
- Navigate to Triggers: On the left menu, find and click on Triggers, then click on New to create a new trigger.
- Name Your Trigger: Give your trigger a name, something like Element Visibility Trigger to keep it clear.
- Choose the Trigger Type: Click on Trigger Configuration, then select Element Visibility from the list of trigger options.
Related Read – How to Install Tag Manager in Webflow?
Step 2: Configure the Element Visibility Trigger
Here, you’ll decide how GTM will detect the element and set conditions for when it should fire.
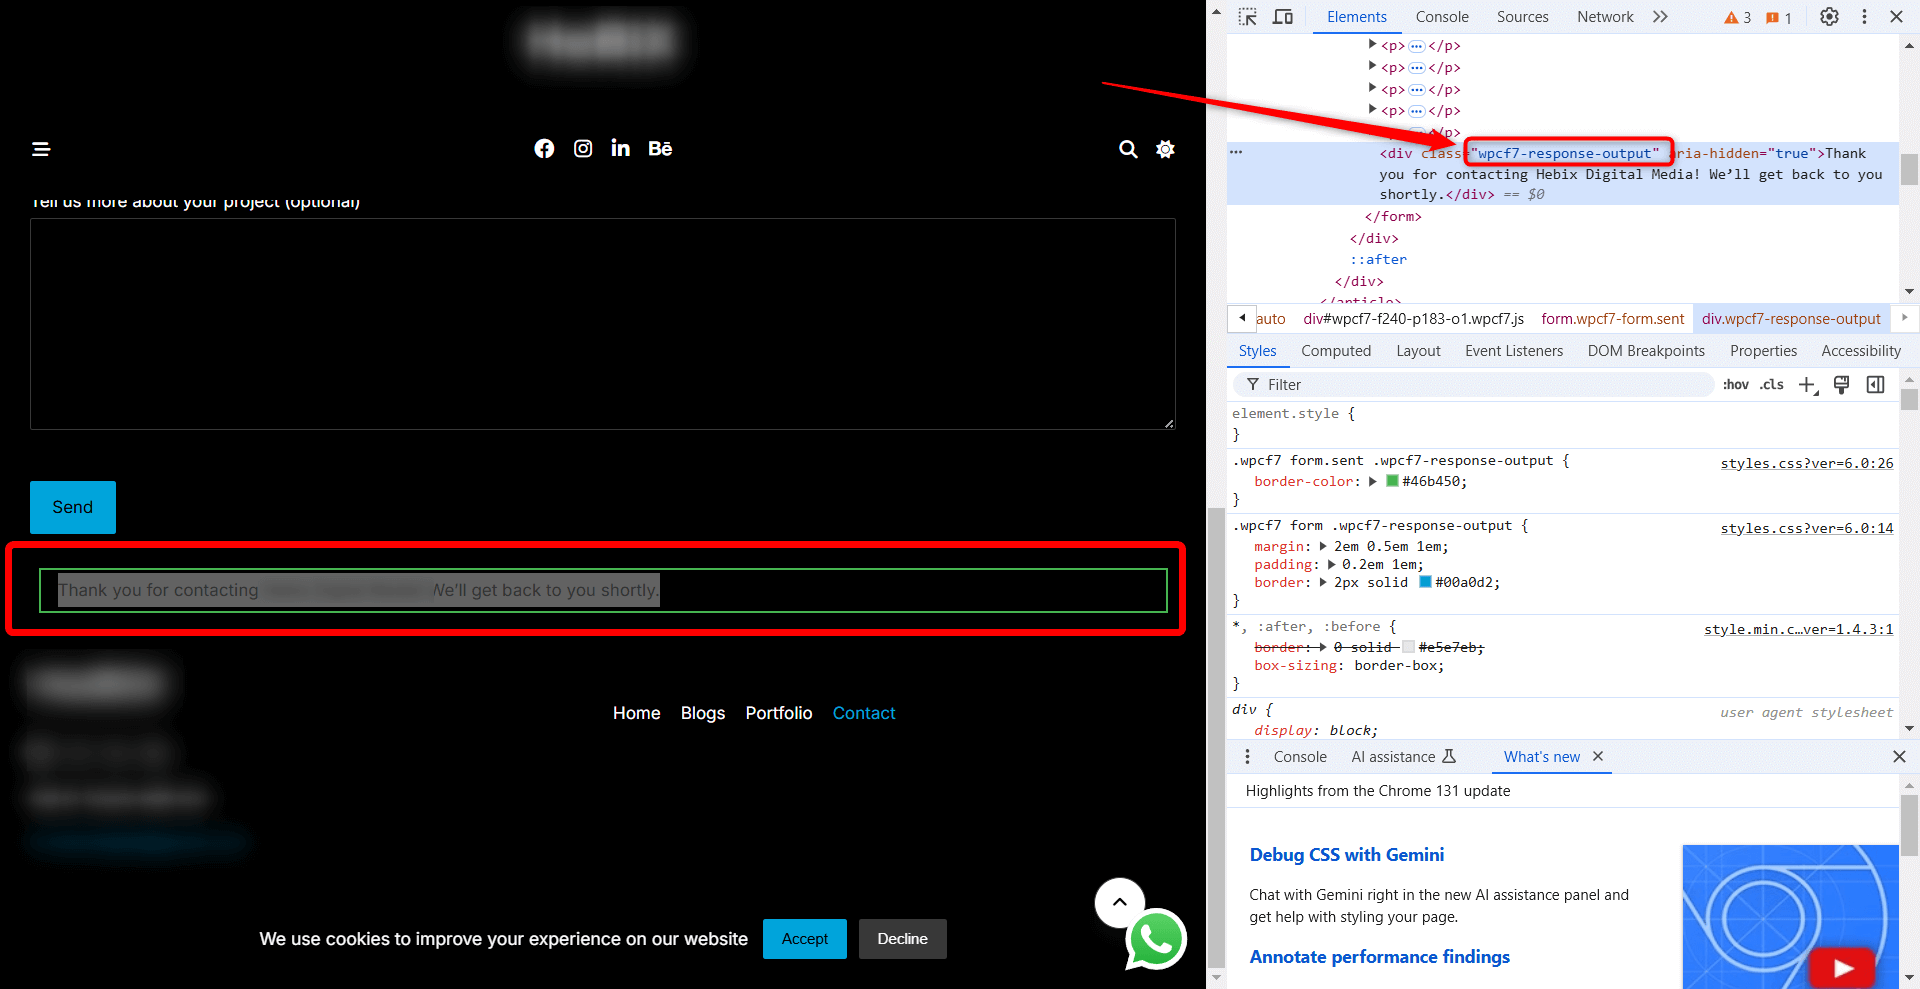
- Selection Method:
- ID: If the element you want to track has a unique HTML ID (e.g., #element-id), select this option.
- CSS Selector: If the element doesn’t have an ID, use a CSS selector. To find this, right-click the element on your page and select Inspect to locate its CSS selector (e.g., .element-class or div > p:nth-child(3)).
- Define the Element:
- If you chose ID, enter the exact ID of the element you want to track (e.g., #my-element).
- If you selected CSS Selector, input the appropriate CSS selector (e.g., .my-class).
- Visibility Settings:
- Observe DOM Changes: Turn this on if the element might load after the page is fully loaded (useful for dynamic content).
- Minimum Percent Visible: Set the visibility threshold (e.g., 50% of the element must be visible before the trigger fires).
- Once per Page: Decide if the trigger should fire only once per page load, or multiple times (for instance, if the element is visible again after being hidden).
- Fire Trigger:
- Choose whether to fire the trigger on Some Visibility Events or All Visibility Events.
- Optionally, you can refine the trigger by setting conditions like the Page URL to ensure it fires only on certain pages or under specific circumstances.
Once you’ve set this up, click Save to create the trigger.
Step 3: Create a Tag to Fire on Element Visibility
Now that you have your trigger, you need to set up a tag that will fire when the element becomes visible.
- Go to Tags: In GTM, click on Tags in the left menu, then click New.
- Name Your Tag: Choose a name for your tag, such as Element Visibility Tag.
- Choose the Tag Type: Select the tag type based on your tracking needs:
- For Google Analytics (GA4), select Google Analytics: GA4 Event.
- Alternatively, you could choose Custom HTML or Universal Analytics Event depending on your setup.
- Configure the Tag:
- For GA4, choose the GA4 configuration tag you set up earlier.
- Enter an Event Name (e.g., element_visible).
- Optionally, add custom parameters like element_text or page_location to capture more specific data.
- Link the Trigger: Under Triggering, select the Element Visibility Trigger you just created.
- Save the Tag: Click Save to finish setting up your tag.
Step 4: Test the Trigger
Before you go live, it’s important to test that everything is working correctly.
- Enable Preview Mode: In GTM, click Preview to activate the debug mode.
- Check the Element: Go to the page where the element is located and scroll until it becomes visible.
- Verify the Trigger: In the debug window that appears, confirm that the Element Visibility Trigger fires and activates the associated tag.
Step 5: Publish the Tag
Once you’ve tested the trigger and tag, and everything looks good, you can publish the changes:
- Go to Your GTM Dashboard: After confirming the tag works correctly, return to the GTM dashboard.
- Click Submit: In the top right, click Submit to finalize your changes.
- Add Version Information: Enter a version name and description (e.g., “Element Visibility Tracking”) and click Publish to make the tag live on your site.
Step 6: View Data in Google Analytics (or Other Platforms)
Now that your tag is live, you can track the visibility of the element in Google Analytics (or your preferred platform):
- Log in to Google Analytics 4 (GA4): Open your GA4 account.
- Navigate to Events: Go to Reports → Events to find the element_visible event, or any custom event you set up.
- Review the Data: You should be able to see how often the element became visible and any additional data you tracked (such as the element’s text or the page URL).
By following these steps, you’ll be able to track when specific elements on your page become visible to users, providing valuable insights into user engagement.
Method 4: Using GA4 Enhanced Measurement (Simple Forms)
This method is ideal for basic forms where a submission leads to a page view or simple interaction.
Step 1: Enable Enhanced Measurement
Go to GA4 → Admin → Data Streams, select your stream, click the settings icon, and make sure “Form Interactions” is enabled. This allows GA4 to automatically track basic form activity.
Step 2: Check the Automatically Collected Events
GA4 typically captures form_submit and form_start events for standard forms. Review your event list to confirm these are being tracked.
Step 3: Create a Custom Event (If Needed)
If the built-in events aren’t precise enough, create your own custom event in Admin → Events.
For example, set up an event like contact_form_submission that fires when:
- An event = page_view
- And the page_location contains your thank-you page URL or slug
This ensures only genuine form submissions are recorded.
Why Track Form Submissions?

Tracking form submissions on a website is important for a variety of reasons, especially for businesses looking to improve their online presence and customer interactions. Here’s why tracking forms can be so helpful:
- Understanding the Customer Journey: By tracking how users fill out forms, businesses can see where customers are coming from and what actions lead them to make a purchase. This gives businesses a clearer picture of which marketing efforts, ads, or website features are driving potential customers.
Important Read: Customer Journey Analytics: All You Need To Know
- Measuring Leads: Tracking form submissions lets businesses keep an eye on how many leads they are generating. Whether it’s a contact form or a sign-up form, knowing how many people are reaching out or showing interest is important for assessing how well a website is performing.
- Improving Customer Service: Forms often act as a bridge between the business and the customer. They make it easy for users to get in touch, ask questions, or share feedback. By tracking these submissions, businesses can respond more quickly, improving overall customer service.
- Gathering Valuable Feedback: Forms are a great way to collect feedback from users, whether it’s about a product, service, or the website itself. Tracking these responses can provide insights into what customers like, what could be improved, and what might be missing.
- Identifying Issues: If the number of form submissions is lower than expected, it might signal a problem. This could point to issues like confusing form design, a slow website, or something in the user experience that’s making it harder for people to complete the form.
- Optimizing Touchpoints: Every form submission is a potential touchpoint with a customer. By tracking these moments, businesses can figure out where improvements are needed to make the process smoother and more engaging, helping to turn visitors into loyal customers.
- Unlocking New Data: Tracking form submissions can give businesses access to new types of data. For example, tracking form submissions as a specific event can help generate new metrics in tools like Google Analytics, providing deeper insights into customer behavior.
- Targeted Advertising: If a user fills out a form, businesses can retarget them with specific ads based on their interest. Conversely, they can also advertise to people who didn’t fill out the form, offering another chance to engage with them and bring them back.
Tracking form submissions in Google Analytics 4 may seem technical, but it’s worth the effort for the insights it provides. By understanding user interactions, you can refine your forms, enhance the user experience, and make decisions backed by data. Start implementing it today and see how it helps you grow your business.


